Before start your journey,have a cup of tea or coffee with you ,it will make you concentrate on your job. Though I am not taking both of these,I feel boring and headache while installing it.So my suggest is to have something with you.
Now. Ready here we go.....
To install Oracle, do the following:
1) Verify that your Operating System is 32-bit by going to My Computer, System Properties

2) The Oracle Database 11g Release 2 files are broken down into two zip files on the Oracle site. That means you need to download both files, and then expand them into an installation directory. I called my installation directory
C:\OracleInstall, but you can call
it whatever works for you. Here’s a screen shot of the directory after
expanding both compressed files (done with WinZip 15).Here is the link I am providing you
http://www.oracle.com/technetwork/database/enterprise-edition/downloads/index.html
and download as per your requirement ,I am talking about 32-bit operating system so just hold your nerve with it only.

3)Inside that you’ll find the
database directory, and it should look like this: Double click on setup.exe

4) If you see the following warning, click Yes.

5) Here you can take your 2nd Sip of Tea or coffee it will take some time. A command window will appear on your screen, do not click anywhere in this window. It will automatically close when it is done.

6) The result after waiting sometime,it will show a window like below
It’s a good idea to provide an email address for security updates no matter what. You can uncheck the box if you don’t want updates via Oracle Support Services. Click the Next button to continue.

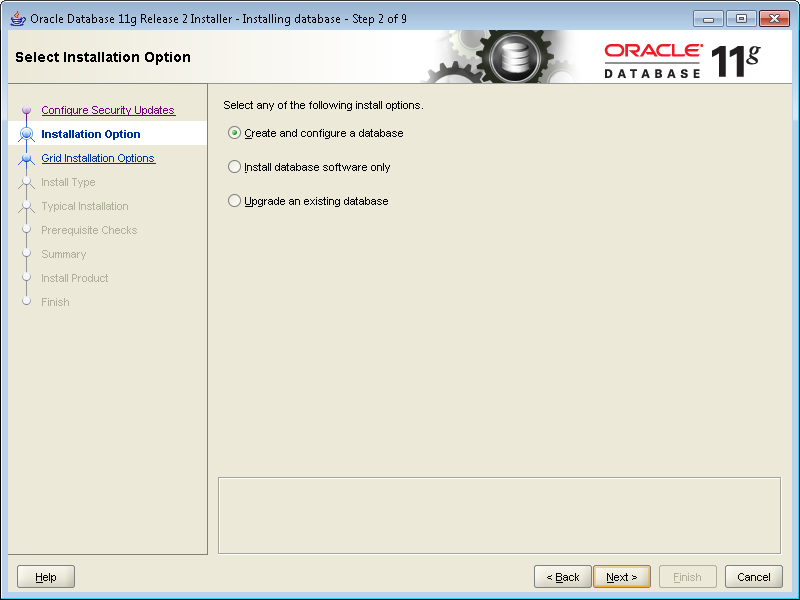
7) Most developers want to Create and configure a database. If that’s your desire, leave the default radio button checked. Click the Next button to continue.
8 Most developers install their test instance on a desktop or laptop. If that’s your desire, leave the default Desktop Class radio button checked. Click the Next button to continue.

9) You will get the following screen:

10) Select where on your hard disk will the installation files and program will be saved. This version
of Oracle needs at least 300 MB of free space in the C drive and a minimum of 3 GB of free
space in another drive. If you have enough space for both just install it all in the C drive.
11) Make sure that under Installation type, Enterprise Edition (3.27 GB) is selected.
12) One of the most important fields to fill is the “Administrative Password”. This will be your main
password for accessing the software. So enter the password of your choice in both the
“Administrative Password” and “Confirm Password” fields, but make sure to remember it. (A
good password to use is admin if this is your own personal computer that no one else uses). The
user names are already predefined as SYS, SYSTEM or SYSMAN. Again, you need to
remember those in order to be able to gain access into Oracle after installation.
13) . After you’re done with steps 15-17, click next. You might get the warning message: “The ADMIN password entered does not conform to the Oracle recommended standards.”
Just ignore this and click yes.
14) If you get an error (or three) regarding invalid characters, make sure that the path you are
installing to does not contain apostrophes (‘) or spaces. Valid paths would include
C:\app\johnsmithscomputer. While an invalid path example would be C:\app\john smith’s
computer.
15) . The following screen is where the Oracle Installer checks for its requirements. Hopefully you’ll
have all the statuses of the checks as succeeded. If not check each warning or failure and see
why you’re getting that status. For example, if you have memory (RAM) on your computer of less
than 1 GB, you will get a notification as this is the minimum requirement.

16) Assuming everything succeeded, now click on Finish to continue. This installation needs to also
install java as one of its components so if you get a message asking to either block or unblock,
choose unblock.
17) Now it's a TEA or COFFEE time. For this part just be patient while Oracle installs. You will be able to see the installation progress. The installation could take up to 30 minutes or more.
19) When the progress bar starts configuring the instance, failures can occur. The first may occur during the network configuration, which typically happens if you didn’t preconfigure the
hosts file. You don’t need to do anything but watch here unless the installer triggers an error.
20 The following progress bar is launched by the Oracle Database Configuration Assistant. It typically runs without a problem. You don’t need to do anything but watch here unless the installer triggers an error. This takes a few minutes, and unfortunately requires you to stick aroung to again authorize Java.

21. The second popup screen requires you to authorize the Java runtime to call home. You should click the Allow Access button to proceed.

22. The third and last popup screen asks you to whether you want to open other scheme. Generally, you should click the OK button to proceed.

- The next dialog shows you that the network and database instances are configured. It’s also running the OEM (Oracle Enterprise Manager) installation. You can wait here but it won’t be a long wait.

- This is the last dialog and says you’ve installed Oracle Database 11g Release 2 successfully. You can the Close button to complete the installation.
No comments:
Post a Comment