Friday, 17 May 2013

EVEN photos have EMOTIONS

 
The vulture is waiting for the child to die so that it can eat him. This picture shocked the whole world. No one knows what happened to the child, including the photographer Kevin Carter who left the place as soon as the photograph was taken.

Three months later he committed suicide due to depression.  


   This is a famous picture, taken in 1930, showing tho young black men accused of raping a white girl, hanged by a mob of 10,000 white men. The mob took them by force from the county jailhouse. Another black man was saved from lynching by the girl’s uncle who said he was innocent. Even if lynching photos were designed to boost white supremacy, the tortured bodies and grotesquely happy crowds ended up revolting many.


 This picture won the Pulitzer Breaking News Photography 2007 award. Photo’s citation reads, “Awarded to Oded Balilty of The Associated Press for his powerful photograph of a lone Jewish woman defying Israeli security forces as they remove illegal settlers in the West Bank.â€?


 Attock a part of Pakistan now passed one of the biggest rivers in the world, the Indus connecting the India and Pakistan largest canal system in the world  before the Pakistani Independance.  


 The Photograph That Destroyed an Industry
"Hindenburg"    

Forget the Titanic, the Lusitania, and the comparatively unphotogenic accident at Chernobyl. Thanks to the power of images, the explosion of the Hindenburg on May 6, 1937, claims the dubious honor of being the quintessential disaster of the 20th century


"Gandhi at his Spinning Wheel," the defining portrait of one of the 20th century's most influential figures, almost didn't happen, thanks to the Mahatma's strict demands. Granted a rare opportunity to photograph India's leader; Life staffer Margaret Bourke-White was all set to shoot when Gandhi's secretaries stopped her cold: If she was going to photograph Gandhi at the spinning wheel (a symbol for India's struggle for independence), she first had to learn to use one herself.


    The use of artificial light was well executed, as is evident by the specular highlights of the paint on the face to give it that extra shiny look. This photo has lovely composition, great ideation and beautiful colours.    


    The only day when you cry & your mom will smile.      


  At the Indian village pond   


A policeman speaks to a young boy at a parade in Washington DC.  The
two-year-old boy is trying to cross the street during the parade.   


          Apprentice lineman J.D. Thompson is breathing life into the mouth of another
apprentice lineman, Randall G. Champion, who hangs unconscious after
receiving a jolt of high voltage electricity.  Photographer Rocco Morabito
was driving in Jacksonville on West 26th Street in July 1967 on another
assignment when he documented the event. 


    City of India .


    Handicapped but able.   


War between life and death,


Hope you like it and there are many more such photos are available but these are my best .


Thanks......                                                                               


Tuesday, 14 May 2013

Copying Files and Directories commands for DBAs:


Many of our tasks deals with copying of Data within same and Different server from Windows to Linux(Unix Based) OS or from any Unix based Operating system
to Other Unix based Operating system.

       
1)tar:tar stands for translate archive.It is most favourite commands for Apps DBAs when performing clonning and refreshing of environment,we use this command for copying huge size directories from one environment to other environment,tar when combined with gzip is the best combination.tar is the most powerful command.

2)scp:scp stands for secure copy.It is the fastest command for copying,again handy tool for DBAs and Apps DBAs.It is use to copy files and directories from one server to another server.

3)gzip and gunzip:gzip is use for compressing files on Unix-based system and gunzip is use for uncompressing the files on Unix-based systems i.e Solaris,Linux,IBM-AIX,HP-UX.
Again very useful command for DBA.

Eg 1:Let's say I want to tar and zip a directory 'bin' and copy it to target server

On Source System:
=================

Tarring and zipping:
===================

tar -cvf - bin | gzip >bin.tar.gz


On Target System:
=================

Copying to Target system:
==========================

scp -rp oracle@testpapp01cdp.comp.com:/product/app/TESTAPPSDB/apps/apps_st/appl/xxtwc/12.0.0/bin.tar.gz .

passwd:

Extracting and Untarring:
=========================

gunzip -c bin.tar.gz|tar -xvf -

Eg 2:

For Compressing:
=================

Let's say you are currently in /product/obiee Directoy and want to compress and zip the OracleBIData Directory,than it can be done as follows:

tar -cvf  /product/obiee/OracleBIData.tar OracleBIData/


>ls -altr
total 987816
drwxr-x---   9 obiee    psapps      1024 Jul  6  2010 OracleBIData
drwxr-xr-x   4 obiee    psapps        96 Jul  9  2010 java
drwxr-x---  20 obiee    psapps      1024 Dec  9  2010 OracleBI
drwxr-xr-x  16 applmgr  oinstall    1024 May 12  2011 ..
drwxrwxrwx   5 obiee    oinstall    1024 Aug  8 21:05 .
-rw-r--r--   1 obidev2  psapps   505448448 Aug  8 21:17 OracleBIData.tar


For Zipping the Directory:
-----------------------------------------------------

$gzip OracleBIData.tar


>ls -altr
total 78256
drwxr-x---   9 obiee    psapps      1024 Jul  6  2010 OracleBIData
drwxr-xr-x   4 obiee    psapps        96 Jul  9  2010 java
drwxr-x---  20 obiee    psapps      1024 Dec  9  2010 OracleBI
drwxr-xr-x  16 applmgr  oinstall    1024 May 12  2011 ..
-rw-r--r--   1 obidev2  psapps   40054038 Aug  8 21:17 OracleBIData.tar.gz


Eg 3:


For Unzipping the Directory:
------------------------------------

$gunzip OracleBIData.tar.gz


For untarring/extracting the Directory:
-------------------------------------------

$tar -xvf OracleBIData.tar


Note:
gzip=>compression
c=create
v=verbose

tar with gzip are the best method to take the backup of directory,since we can do it very fast and it saves the Disk space efficiently.

Note:tar command options are operating system dependent,so please check with man command command for using various options.


4)rsync:rsync is a great tool for backing up and restoring files,from source system to target system.It is Useful tool for DBAs.It is very important to remember this command works on linux and Doesn't work on Solaris Operating system as rsync doesn't have manual entry on it.

Eg 4:Copy all directories and file structure with all the ownership,permissions and symbolic links.


On Target System:
=================

rsync -arv oracle@testpapp01cdp.comp.com:/tmp/rafi/bin /tmp/rafi/backup_bin

(/tmp/rafi=>current working directory on Target Server)


5)sftp:sftp stands for secure file transfer protocol.some times if scp ports are disabled due to security reason than you can use sftp.It is very much secure way
of copying files and directories from source to target Server.This is very useful for DBAs and Apps DBAs.

Eg 5:Copying files from one server to other server

Using sftp for copying from qb to prod:
------------------------------------------

On Target System:
=================

oracle@[testpapp01cdp]-> sftp oracle@testqapp02cdp.comp.com:/tmp/rafi
Connecting to testqapp02cdp.comp.com...
Password:
Changing to: /tmp/rafi
sftp> ls
sftp> get lookup_xxtwc_perf_level_planned_perc.ldt
Fetching /tmp/rafi/lookup_xxtwc_perf_level_planned_perc.ldt to lookup_xxtwc_perf_level_planned_perc.ldt

6)winscp:winscp is GUI(Graphical user interface) based tool for copying files from windows to Linux(Unix environment) and vice-versa.I like this tool very much,since it is very much user friendly.But,for copying large amount of data it takes using this tool.In this tool you can save the machine name and login with privilege user and copy the files.

7)ftp:ftp stands for  file transfer protocol and use for copying files from windows to linux(Unix environment) and vice-versa.This is fast method of copying files.
 2mb of data can be copied in less than 5 minutes.

Eg 7:

On Target System(Windows):
===========================

Go to the target folder in windows.

C:\Documents and Settings\rafiuddin_alvi>cd D:\TEST

C:\Documents and Settings\rafiuddin_alvi>d:

D:\TEST>ftp testdapp01cdc.comp.com
Connected to testdapp01cdc.comp.com.
220 testdapp01cdc.comp.com FTP server ready.
User (testdapp01cdc.comp.com:(none)): oracle
331 Password required for oracle.
Password:
230 User oracle logged in.
ftp> help
Commands may be abbreviated.  Commands are:

!               delete          literal         prompt          send
?               debug           ls              put             status
append          dir             mdelete         pwd             trace
ascii           disconnect      mdir            quit            type
bell            get             mget            quote           user
binary          glob            mkdir           recv            verbose
bye             hash            mls             remotehelp
cd              help            mput            rename
close           lcd             open            rmdir
ftp> cd /tmp/rafi
250 CWD command successful.
ftp> dir
200 PORT command successful.
150 Opening ASCII mode data connection for /bin/ls.
total 4640
-rwxrwxrwx   1 oracle  twcother 2272275 Aug  6 03:18 cn_reports.rpd
-rwxrwxrwx   1 oracle  twcother    8115 Jul  7 19:07 DisputeSrchPG.xml
-rwxrwxrwx   1 appldev2 oinstall     916 Jul 25 04:38 L6958530.log
-rwxrwxrwx   1 appldev2 oinstall     880 Aug  6 08:06 L6960409.log
-rwxr-xr-x   1 oracle  twcother      23 Aug  8 20:11 test1.sh
-rwxrwxrwx   1 appldev2 oinstall   22889 Jul 25 04:38 XX_QUINTILE_BATCH.ldt
-rwxrwxrwx   1 oracle  twcother    1802 Jul  5 06:48 XXTaskPerzSumCO.class
-rwxrwxrwx   1 oracle  twcother    1934 Jul  7 19:07 XXTaskSummaryCO.class
-rwxrwxrwx   1 appldev2 oinstall   20235 Aug  6 08:06 XXTWC_REPORT_METRIC_VAL
.ldt
226 Transfer complete.
ftp: 672 bytes received in 0.08Seconds 8.62Kbytes/sec.
ftp> get test1.sh
200 PORT command successful.
150 Opening ASCII mode data connection for test1.sh (23 bytes).
226 Transfer complete.
ftp: 24 bytes received in 0.00Seconds 24000.00Kbytes/sec.

ftp> get cn_reports.rpd
200 PORT command successful.
150 Opening ASCII mode data connection for cn_reports.rpd (2272275 bytes).
226 Transfer complete.
ftp: 2284457 bytes received in 113.08Seconds 20.20Kbytes/sec.

     To exit ftp:
  
ftp> bye
221-You have transferred 2284481 bytes in 2 files.
221-Total traffic for this session was 2285843 bytes in 3 transfers.
221-Thank you for using the FTP service on testdapp01cdc.comp.com.
221 Goodbye.

b)Putting files from source(Windows) to Target(Linux):

ftp> mput my_docs.txt
mput my_docs.txt? y
200 PORT command successful.
150 Opening ASCII mode data connection for my_docs.txt.
226 Transfer complete.
ftp> dir
200 PORT command successful.
150 Opening ASCII mode data connection for /bin/ls.
total 4640
-rwxrwxrwx   1 oracle  twcother 2272275 Aug  6 03:18 cn_reports.rpd
-rwxrwxrwx   1 oracle  twcother    8115 Jul  7 19:07 DisputeSrchPG.xml
-rwxrwxrwx   1 appldev2 oinstall     916 Jul 25 04:38 L6958530.log
-rwxrwxrwx   1 appldev2 oinstall     880 Aug  6 08:06 L6960409.log
-rw-r--r--   1 oracle  twcother       0 Aug  8 20:48 my_docs.txt
-rwxr-xr-x   1 oracle  twcother      23 Aug  8 20:11 test1.sh

8)cp:cp is the most basic command in linux(Unix environment) for copying files within same directory or directories on Same server.

Eg 8:To copy test1.sh to Target location /tmp/rafi,we can use below command.

testdapp01cdc(/export/home/oracle) >cp test1.sh /tmp/rafi

testdapp01cdc(/tmp/rafi) >ls -altr *test*
-rwxr-xr-x   1 oracle  twcother      23 Aug  8 20:11 test1.sh

Oracle DBA Commands


1. List of Database Instances running on DB server

-bash-4.1$ ps -ef | grep smon

  root   1147      1   0   Mar 30 ?                 484:50 /u01/app/11.2.0.3/grid/bin/osysmond.bin
  oracle   1818      1   0   Mar 30 ?                0:25 asm_smon_+ASM1
  oracle   2662      1   0   Mar 30 ?                1:34 ora_smon_remotedba1
  oracle   4487   4449   0 08:43:17 pts/1       0:00 grep smon


SMON is the must run database process. So check no of smon's listed by above command and you will come to know number of DB instances running. 
       1. asm_smon +ASM1 and 2. remotedba1

If database is not running, Remote DBA can see error like "ORA-01034 : ORACLE not available. ORA-27101 : shared memory realm does not exist" This can be resolve by starting the database. 


2. Setting $ORACLE_HOME and $ORACLE_SID environment Variable 

To log into the Database, $ORACLE_HOME environment variable must be set, you can set this each time you log in or can fix this permanently in .bash_profile file. A DBA can fix this permanently.

-bash-4.1$ export ORACLE_HOME=/u01/app/oracle/product/11.2.0.3/dbhome_1

If you don't know, your environment ORACLE_HOME path, use simple techniques to find out.

-bash-4.1$ export ORACLE_SID=remotedba1

Since, you might have more than one instance running on a server, so you have to set ORACLE_SID
variable to work on a specific instance.

-bash-4.1$ cd $ORACLE_HOME/bin
-bash-4.1$ ./sqlplus sys as sysdba
SQL>


3. Cross Check Instance Name After login

This is the most important Oracle DBA command, When you work on more than one instances on single server. So you frequently switch between Database Instances and suppose you want to shutdown DB instance DB1 but by mistake you forgot to set ORACLE_SID for test_DB1 and ORACLE_SID was set to prod_db1 and you shutdown the database.

I believe you have understood, what i want to say. So, i would strongly suggest to check instance
name before doing any change in to database.

SQL> select instance_name from v$instance;

INSTANCE_NAME
----------------
prod_db1

In case of RAC, Suppose there are two instances.

SQL> select instance_name from gv$instance;

INSTANCE_NAME
----------------
prod_db1
prod_db2


4. Verify Instance Status

A database instance can be in no mount, mount and open status. Important to notice is user can only
connect to the database if it's status is "open". So if, you have done some changes in Database
and restarted the DB instance make sure it's status is "open"

SQL> select STATUS from v$instance;

STATUS
------------
OPEN

In RAC env. Suppose there are two instances.

SQL> select STATUS from gv$instance;

STATUS
------------
OPEN
OPEN
 
5. Listener is Up and Running

Though, everything is fine and Database is also running, Network between client and server is responding even then Remote DBA is not able to connect to Database Instance. In this case Listener could be the problem. If Listener is not up and running, you can't connect to database instance using tnsname from a client system.

Command to check Listener status

[oracle@test instance]$ lsnrctl status

LSNRCTL for Linux: Version 10.2.0.4.0 - Production on 25-MAY-2011 11:46:47
Copyright (c) 1991, 2007, Oracle.  All rights reserved.
Connecting to (DESCRIPTION=(ADDRESS=(PROTOCOL=TCP)(HOST=192.168.4.***)(PORT=1521)))
STATUS of the LISTENER
------------------------
Alias                     LISTENER
Version                   TNSLSNR for Linux: Version 10.2.0.4.0 - Production
Start Date                24-MAY-2011 10:38:30
Uptime                    1 days 1 hr. 8 min. 17 sec
Trace Level               off
Security                  ON: Local OS Authentication
SNMP                      OFF
Listener Parameter File   /opt/oracle/product/10.2.0/db_1/network/admin/listener.ora
Listener Log File         /opt/oracle/product/10.2.0/db_1/network/log/listener.log
Listening Endpoints Summary...
  (DESCRIPTION=(ADDRESS=(PROTOCOL=tcp)(HOST=192.168.4.***)(PORT=1521)))
  (DESCRIPTION=(ADDRESS=(PROTOCOL=ipc)(KEY=EXTPROC0)))
Services Summary...
Service "PLSExtProc" has 1 instance(s).
  Instance "PLSExtProc", status UNKNOWN, has 1 handler(s) for this service...
Service "test01" has 1 instance(s).
  Instance "test01", status UNKNOWN, has 1 handler(s) for this service...
The command completed successfully.

if your output is like above than at least there is no problem from listener running point of view , otherwise DBA has to trouble shoot this.

6. Available free Disk Space

-bash-4.1$ df -h

Filesystem             Size   Used  Available Capacity  Mounted on
rpool/ROOT/solaris_11
                        30G    18G         0K   100%    /
/devices                 0K     0K         0K     0%    /devices
/dev                     0K     0K         0K     0%    /dev
ctfs                     0K     0K         0K     0%    /system/dba
swap                    26G   1.3M        26G     1%    /system/swap

Though, this is a three letter command, but can save remote DBA from so many problem and can resolve same number of problems as well.Suppose, Database server mount point having UDUMP / BDUMP / CDUMP is full and you restart the database.

Database will not start and will give "ORA-09817: Write to audit file failed No space left on device" . However, deleting some old trace files can solve this. But, i would suggest to keep an eye on all mount points using some cron job etc.

7. Ping and Tnsping

These are basic commands for Remote DBA to trouble shoot Client server database connection issues. Sometimes, set up is absolutely fine even then client and server connection doesn't happen. To resolve these issues DBA can use these commands.

C:\Users\umesharm>ping 192.168.4.50

Pinging remote_dba.dba-oracle.com [192.168.4.50] with 32 bytes of data:
Reply from 192.168.4.50: bytes=32 time=432ms TTL=245
Reply from 192.168.4.50: bytes=32 time=424ms TTL=245
Reply from 192.168.4.50: bytes=32 time=446ms TTL=245

If you are getting reply from Database Server as shown in above output. This means networking is not the issue now, you have to look at some other directions like tnsname.ora, sqlnet.ora configuration etc and use tnsping for further investigate.

C:\Users\umesharm>ping 192.168.4.50

Pinging remote_dba.dba-oracle.com [192.168.4.50] with 32 bytes of data:
Request timed out.
Request timed out.
Request timed out.
Request timed out.


Ping statistics for 192.168.4.50:
    Packets: Sent = 4, Received = 0, Lost = 4 (100% loss),


Above command shows that, client is not able to connect to Database Server. In this case DBA has to take help from Networking team.

Below command show, How to check client server connection using tnsping {service name} 

-bash-4.1$ /u01/app/oracle/product/11.2.0.3/dbhome_1/bin/tnsping remote_db1

TNS Ping Utility for Solaris: Version 11.2.0.3.0 - Production on 26-APR-2013 10:08:08
Copyright (c) 1997, 2011, Oracle.  All rights reserved.
Used parameter files:
/u01/app/oracle/product/11.2.0.3/dbhome_1/network/admin/sqlnet.ora
Used TNSNAMES adapter to resolve the alias
Attempting to contact (DESCRIPTION = (ADDRESS = (PROTOCOL = TCP)(HOST = remote_db1-scan)(PORT = 1521)) (CONNECT_DATA = (SERVER = DEDICATED) (SERVICE_NAME = remote_db1)))
OK (270 msec)

If you got OK at last of the output it is fine. Otherwise, you might get error like below

-bash-4.1$ /u01/app/oracle/product/11.2.0.3/dbhome_1/bin/tnsping remote_db2

TNS Ping Utility for Solaris: Version 11.2.0.3.0 - Production on 26-APR-2013 11:18:42
Copyright (c) 1997, 2011, Oracle.  All rights reserved.
Used parameter files:
/u01/app/oracle/product/11.2.0.3/dbhome_1/network/admin/sqlnet.ora
TNS-03505: Failed to resolve name

In this case, look at tnsname.ora configured on client system.


Thursday, 9 May 2013

Creating a Database using Database Configuration Assistant

Database Configuration Assistant (DBCA) provides a graphical interface for database creation and database configuration. This document will detail the creation of a database using the Database Configuration Assistant.

On UNIX systems Database Configuration Assistant can be started with ORACLE_HOME/bin/dbca. On Windows systems Database Configuration Assistant can be found in the Start menu under All Programs | Oracle Home | Configuration and Migration Tools.


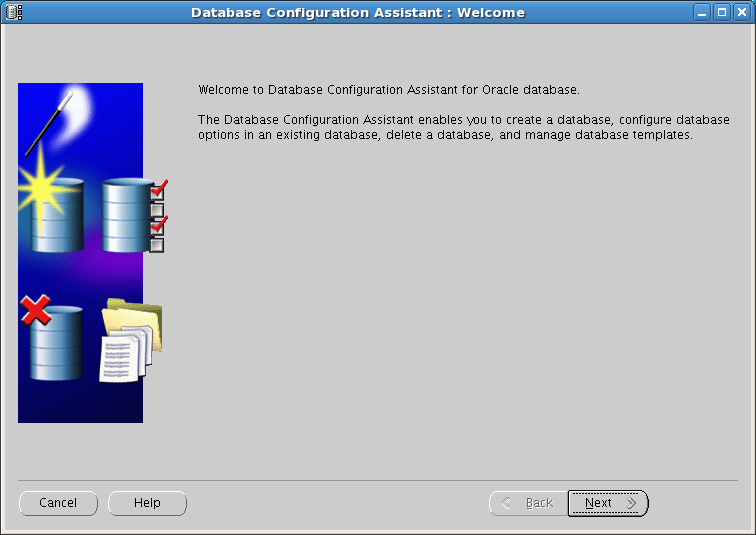
After the initialization process completes you will be presented with the Welcome screen. Click the Next button to continue.


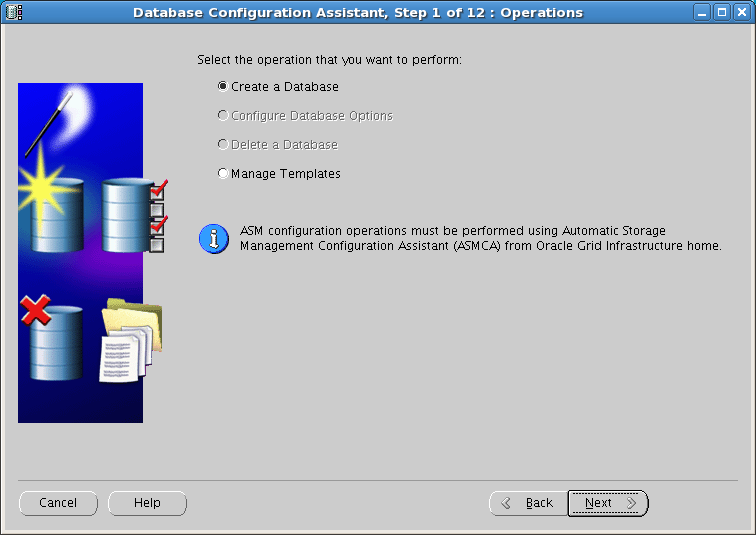
On the Operations dialog you have ability to Create, Configure Database Options and Delete a database. If DBCA is started on server with no databases configured and registered only the Create Database and Manage Templates options will be available.


Templates are a way to standardize and automate the creation of databases. DBCA includes three templates by default. Ensure that the Create Database option is selected and click the Next button to continue.


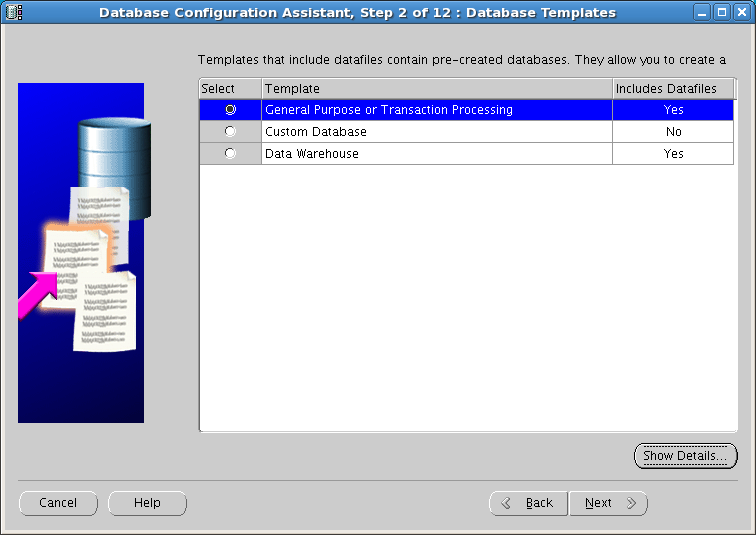
On the Database Templates dialog you have the ability to choose from three default templates. The General Purpose or Transaction Processing template builds a database with configurations geared for OLTP type of access and the Data Warehouse template builds a database with configurations geared toward data warehouse activities. The third option, Custom Database is provides the most flexibility in database configuration and will be the template used in this document.
You can inspect the configuration options by selecting a template and then click the Show Details… button. A new dialog window will appear detailing the Oracle components to be installed, character set, initialization parameters and file names and locations.

Ensure Custom Database is selected and click the Next button to continue.


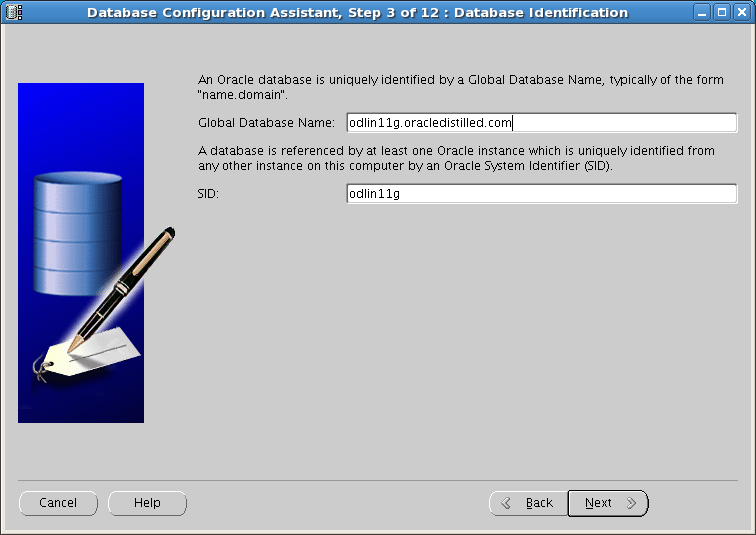
The Global Database Name is in the format < database name >.< domain name >. The database to be created in this document is odlin11g and the domain name is oracledistilled.com resulting in a Global Database Name of odlin11g.oracledistilled.com. The SID is generally the first 13 characters of the database name.

Provided a Global Database Name and SID then click the Next button to continue.


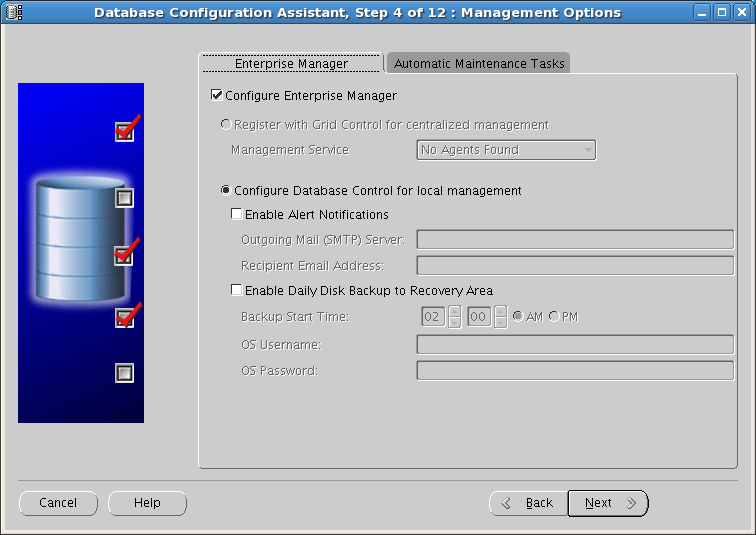
On the Management Options dialog you have the choice between using Enterprise Manager Database Console or registering the new database with Grid Control. An Oracle Enterprise Manager Grid Control Agent must be installed and running in order to register the database with Grid Control.
In this example the agent is not installed so the only option available is to use Database Control for local management. When using the Database Control you can choose to enable alert notification and schedule daily disk based backups. For this example we are not enabling the alert notifications or the daily backups.

Click the Automatic Maintenance Tasks tab.


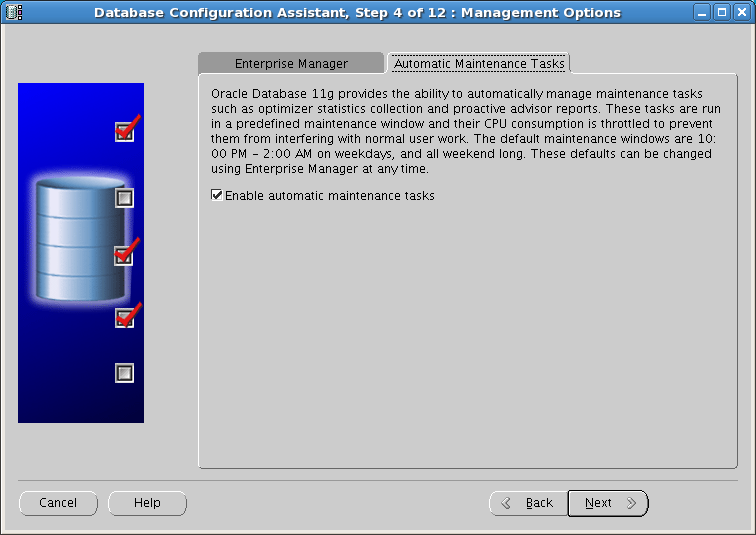
Under the Automatic Maintenance Task tab you have the ability enable or disable database maintenance jobs such as statistics collections, SQL tuning recommendations, As stated in the dialog these jobs are scheduled to run in default maintenance windows between 10pm and 2am weekdays and all weekend long.

After making any desired changes click the Next button to continue.


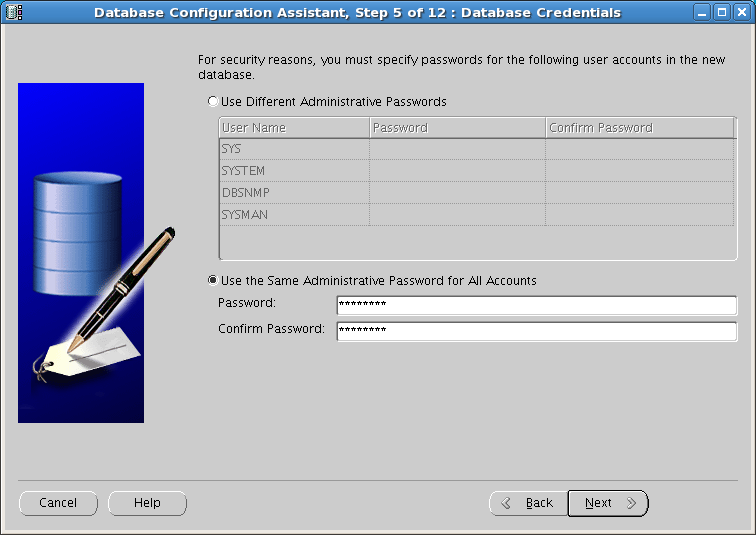
On the database credentials dialog you have the ability to provide a distinct password for the administrative users or use one password for all administrative users.
You might get a warning on the passwords chosen if they do not meet the following format: at least 8 characters in length, at least 1 upper case letter, at least 1 lower case letter and at least 1 digit. Enter the passwords and click the Next button to continue.


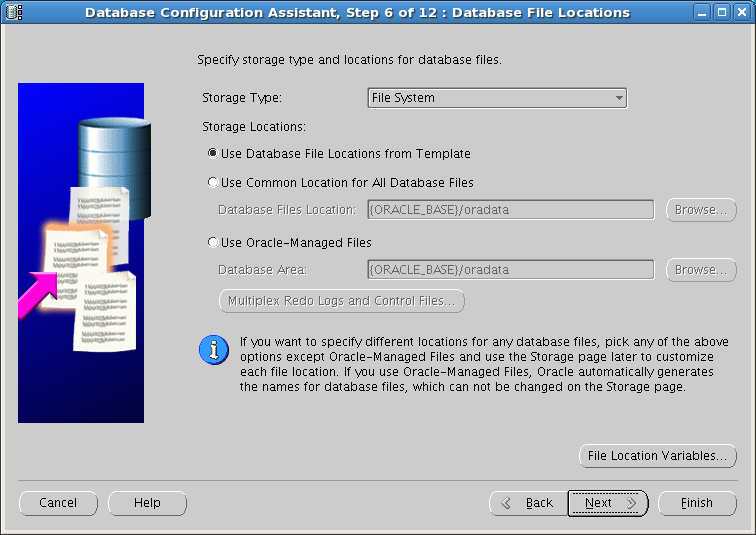
On the Database File Locations dialog you have the option of storing the files on a file system or ASM. ASM is only available as an option if an ASM instance is present on the server.
For the Storage Locations there are three options: Locations stored in template, Common location for all database files, Oracle-Managed files.
Locations from Template- DBCA will use the directory information contained in the template.
Common Location for All Database Files- All database files will be stored in the location provided.
Oracle-Managed Files- All database files will be stored in a location provided. File naming, creation and deletion is handled automatically by the database. Using this option you can choose to multiplex the redo logs and control files.
The File Location Variables… button can be used view the values to be used for the variables {ORACLE_BASE}, {ORACLE_HOME}, {DB_NAME}, {DB_UNIQUE_NAME}, {SID}.
For this example the files will be stored on the file system using a common location for all files.


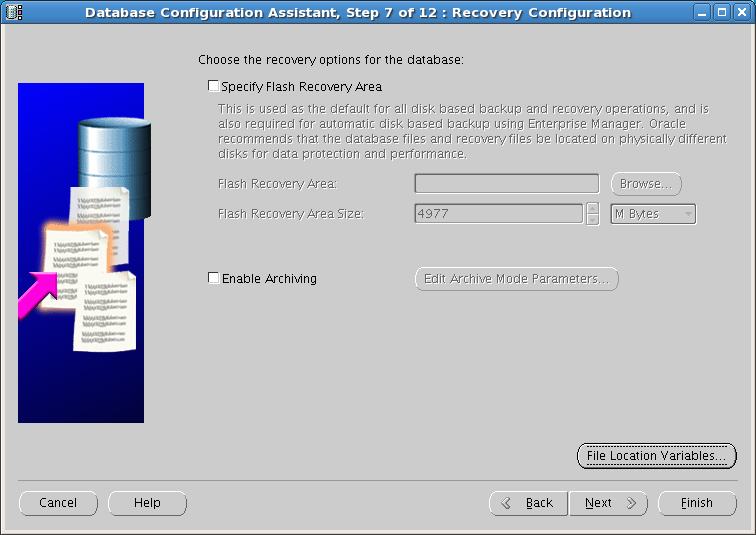
You can choose to enable the Fast (Flash) Recovery Area by providing a location along with a maximum size to be utilized by the Fast Recovery Area. The Fast Recovery Area is used to store and manage files related to backup and recovery of the database. The Fast Recovery Area is separate from the database files and is managed by the Fast Recovery Area Size.
If you choose to enable archiving you can click the Edit Archive Mode Parameters in which you enable automatic archiving, log file format and the destination in which to write the archive logs.

Click the Next button to continue.


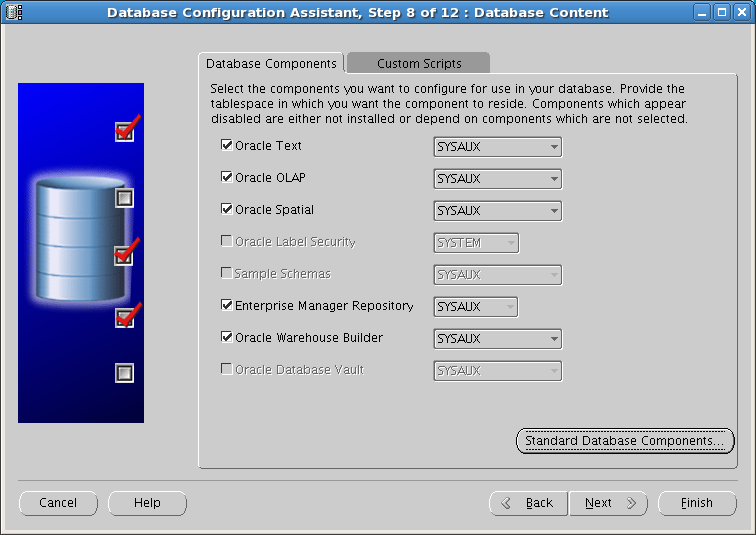
On Database Options dialog you can select database components and the locations in which to install them including creating a new table space if necessary. Note: If you are creating a database for production use you should only install options in which you have a license.
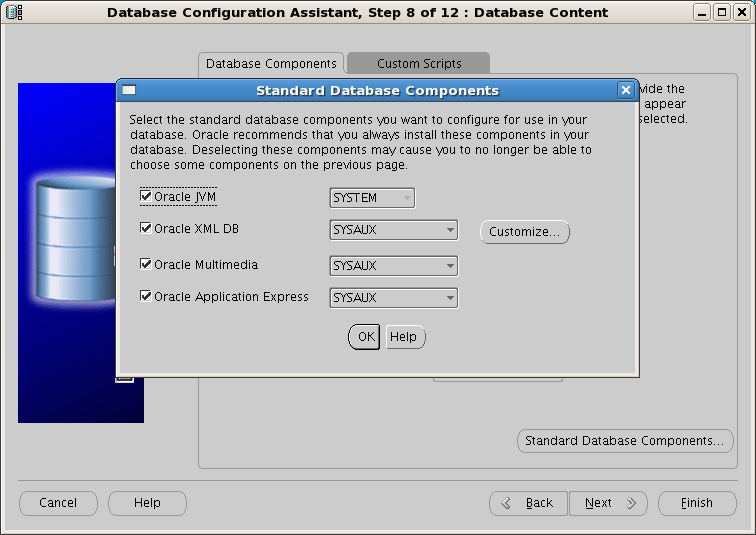
Click the Standard Database Components… button to change the install locations for components such as XML DB, Java Virtual Machine, Application Express and Oracle Multimedia.


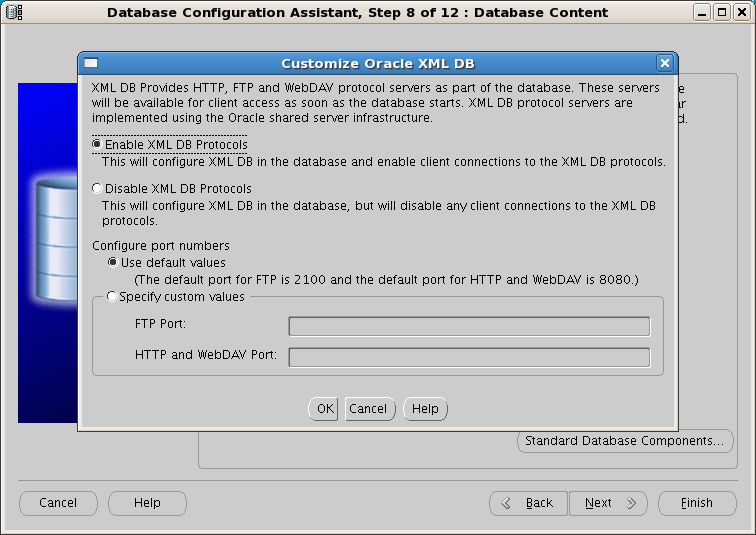
The XML DB option can be further customized by clicking the Customize… button.


Make any changes to the XML DB configuration and click the OK button to return to the Standard Database Components dialog. Click the Cancel button if you have no changes to make. On the Standard Database Components dialog click the OK button to go back to the Database Content dialog.
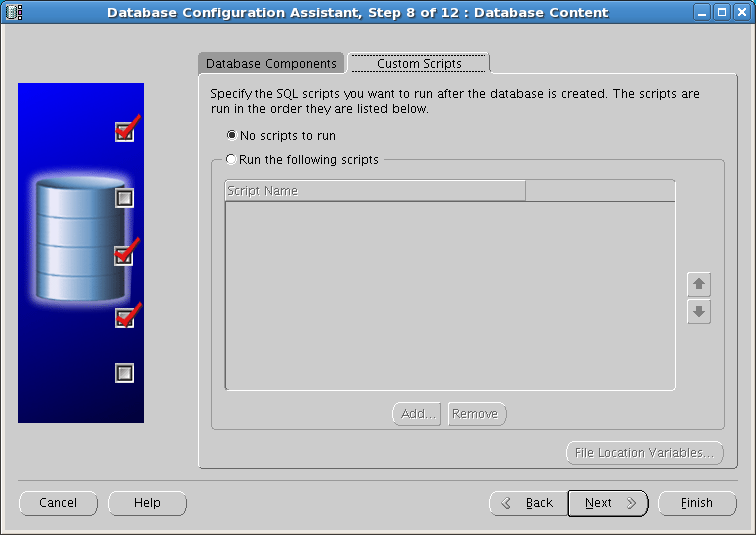
On the Database Content dialog click the Custom Scripts tab.


If you were to have any scripts that need to be executed after the creation of the database you can add them on this dialog. Note that the scripts run in the order listed. You can use the arrow buttons on the right to change the order of execution.

After making your changes click the Next button to leave the Database Content dialog.


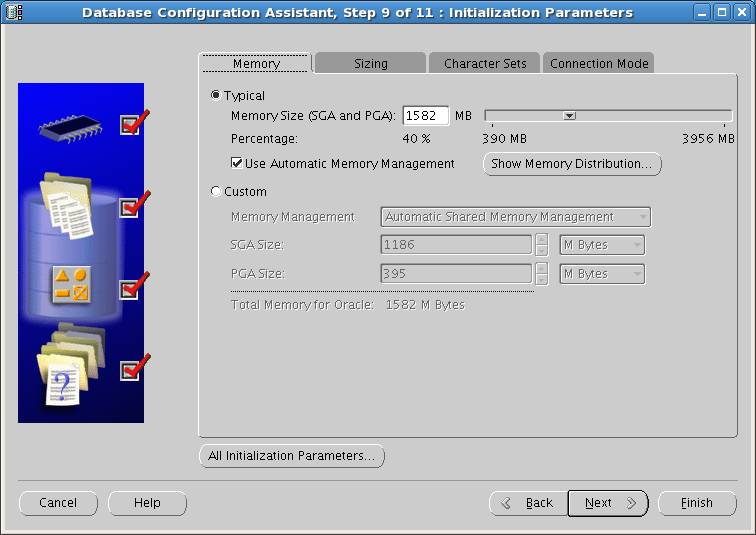
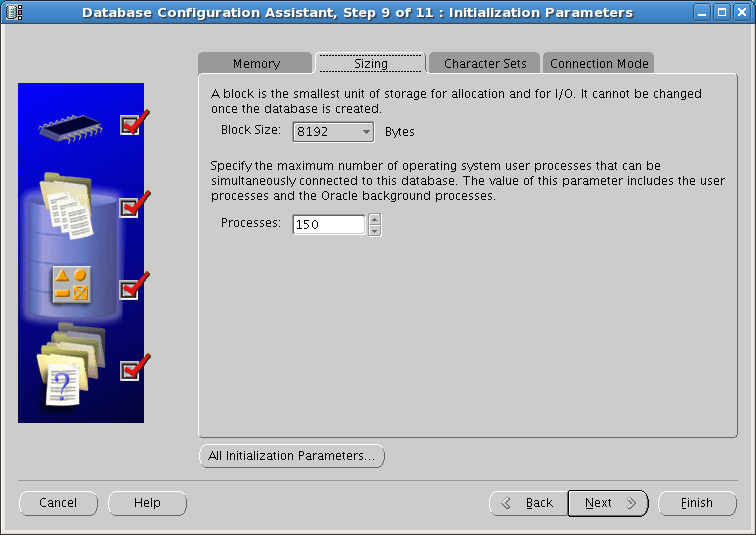
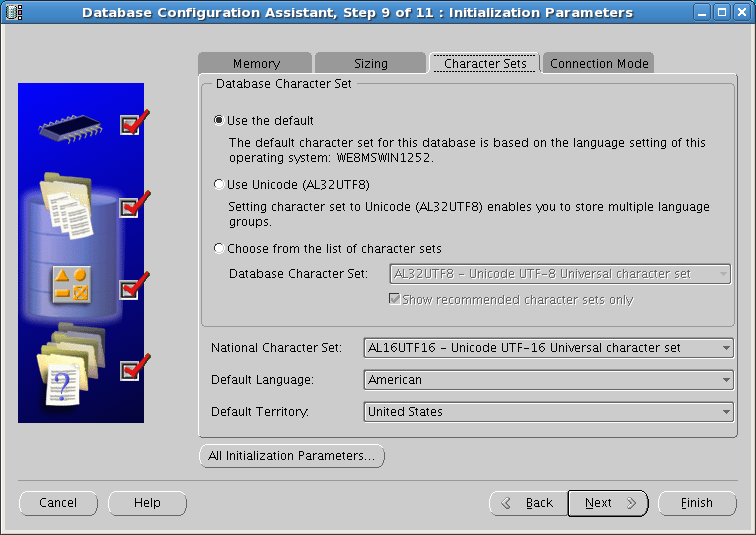
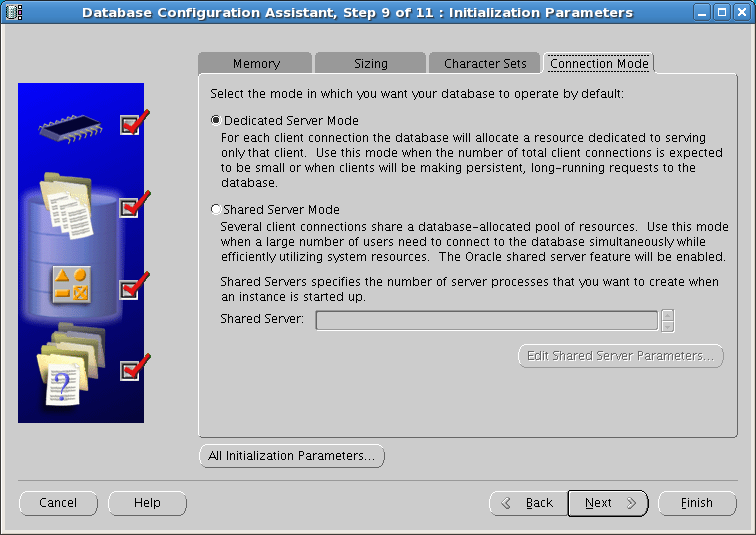
The Initialization Parameters dialog contains four sections: Memory, Sizing, Character Sets, Connection Mode.
Oracle 11g introduced Automatic Memory Management as means of further simplifying sizing of the SGA and PGA. Instead of providing values for the SGA and PGA you can provide one value that the instance will use to automatically adjust memory components in the SGA and individual PGAs as needed. Automatic Memory Management is selected by default.
If desired you can select the Custom option and choose Manual Memory Management.
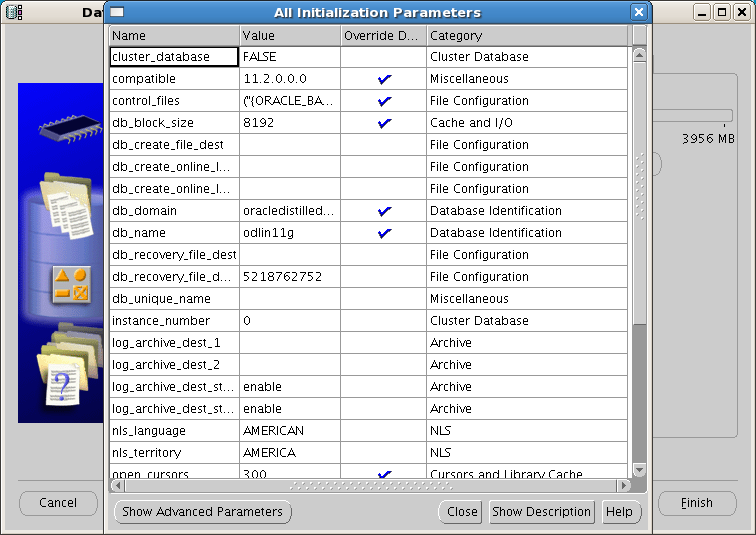
The All Initialization Parameters… button will bring up a window that list all of the initialization parameters. Using this screen you see all of the values to be assigned to the parameters as well as choose to override the values.


Click the Close button to close the Initialization Parameters window.
Click the Sizing tab
On the Sizing tab you can specify the block size and the maximum number for processes that can simultaneously connect to the database.


Click the Character Sets tab
The character set determines which languages can be represented in the database. The default character set is based on the language setting of the host operating system. You also have the choice between a Unicode character set or selecting a national character set.


Click the Connection Mode tab

On the Connection Mode tab you can choose between dedicated server mode or shared server mode. In dedicated server mode each user process has a dedicated server process. This mode is used in situations were the number of client connections is small or when clients typically make long running database requests. Dedicated connection mode is the default connection mode.
In a shared server connection mode client processes share a database-allocated pool of server processes. This mode is used in situations were the number of clients is expected to be high with typically small work loads. When selecting a shared server configuration you will need to provide the number of server process to create a database startup.


After making any necessary changes click the Next button to continue.
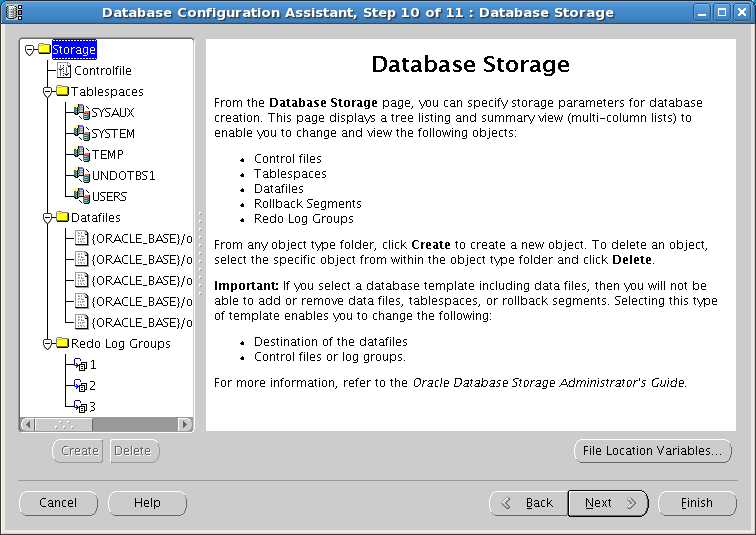
Database Storage


On the Database Storage dialog you can structure of the database by adding, removing or modifying control files, data files and online redo log groups. You can only make changes to the structure if you did not choose a pre-configured template.

Click the Next button to continue.


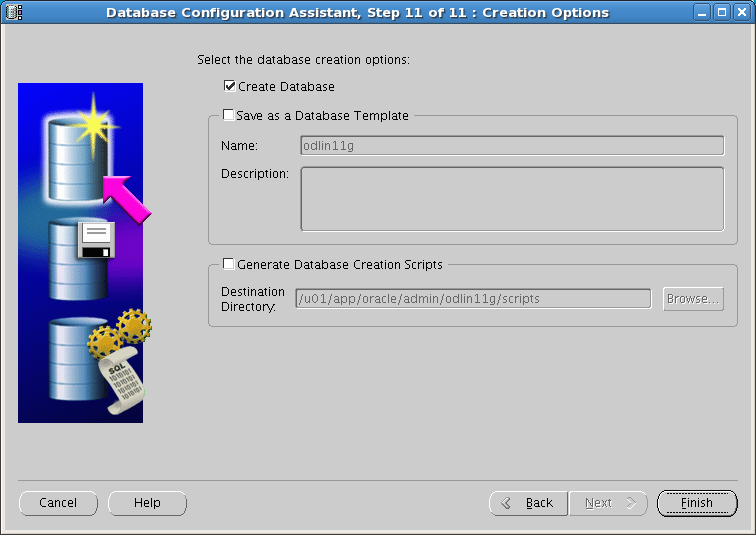
You have the options of creating a template and or generate database creation scripts. If you choose to generate a template it will be available for selection on future executions of DBCA. The custom scripts can be used to create a database with all the selections made during this run of DBCA.
Click the Finish button to create the database.


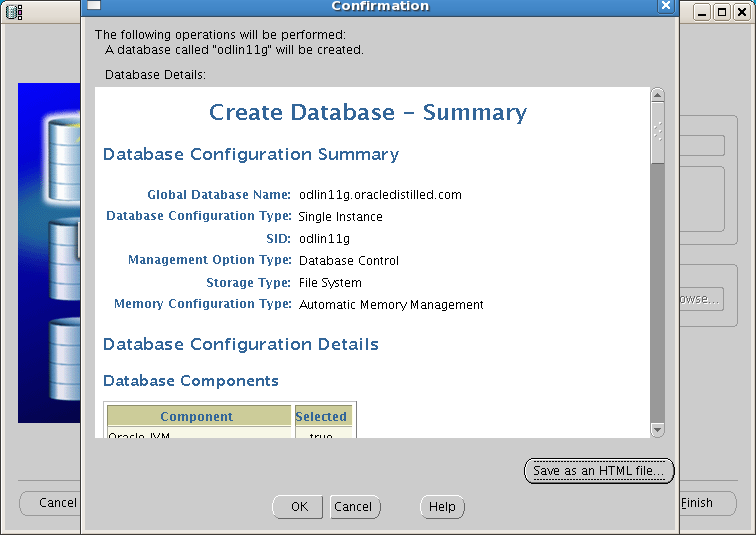
The Confirmation page detail all the choices made previously that will be used to create the database.


After reviewing the summary page if you find that you need to make changes click the cancel button to go back to the Creation Options dialog and use the back button to go back to the dialog in which you need to make changes, otherwise click the OK button to start the database creation.


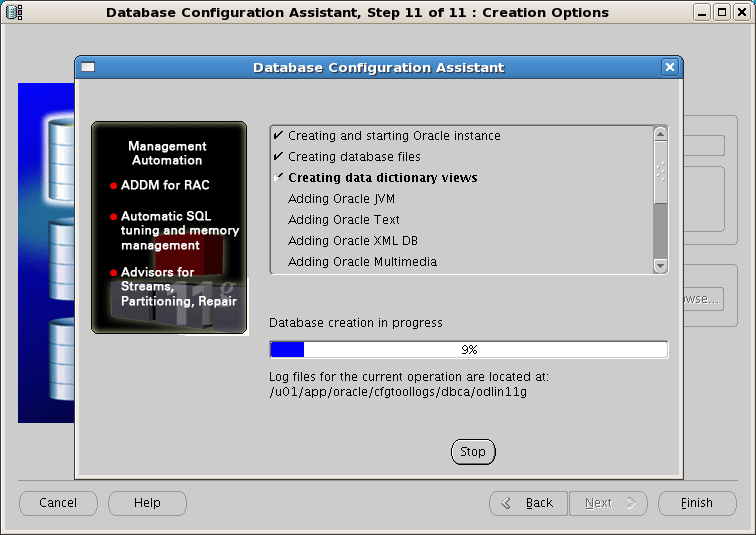
The progress dialog will detail the database creation process along with showing the percentage complete.


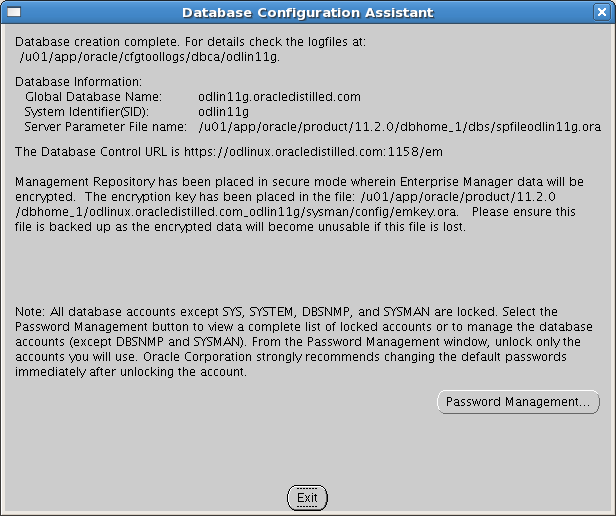
After the database creation is complete the last dialog will provide details such as the global database name, system identifier (SID) and the locations of the server parameter file and encryption key. Also provided on this dialog is the URL in which to connect to Oracle Enterprise Manager Database Console.

Thursday, 2 May 2013

Manual hot backup/restore of an Oracle 11gR2 database


Every one thinking about RMAN(Recovery Manager) when we are talking about the Database backup and recovery. But there are still different some different procedures are preset via which we can backup and restore or recover the database,.Ex. import and export and manually etc

Here are the manually hot backup /restore of an Oracle 11gR2 database.

The steps to successfully accomplish a manual hot backup and restore of an Oracle11gR2 database without using the RMAN utility.

Pre-requisites-

Perform the following steps to set up your database for a backup operation

1. Determine the location of your database. For example, in oracle 11gR2 default install location for a database instance with SID=UPGRADE would be:

               C:\app\<username>\oradata\UPGRADE

2. Database comprises of control files, redo log files, Data files


3. Locate the pfile and spfile of your database instance, and back them up if necessary. (refer to this link)
4. Connect to your database instance using sqlplus. Run the following command on the command prompt
               C:\>sqlplus / as sysdba 

5. Run the following query on the SQL Plus syntax to determine if you are connected to the right database
              Query: Select name from v$database;


Set up the database to be able to perform a hot backup-

1. Check if the database is in archivelogmode


             Query: Select log_mode from v$database;
2. If the database is not in archivelogmode then put the database in the archive log mode

        a.) View the location where the archive logs would be written

                         Query:  show parameter log_archive_dest_1;

        b.) Set the value of this parameter to a desired location

                        Query:  alter system set log_archive_dest_1=’LOCATION=<path to desired directory>’ scope=spfile;

                        Example: alter system set 

log_archive_dest_1=’LOCATION=c:\my_directory_for_logfiles’ scope=spfile;

        c.) Shutdown the database
                        Query: shutdown immediate;

        d.) Start database in mount mode
                        Query:  startup mount;

        e.) Alter the database to start archive logging
                       Query: Alter database archivelog;

        f.) Open the database so that it is available for transactions
                      Query: Alter database open;

        g.) Verify that the database is in archivelogmode
                      Query: select log_mode from v$database;


  h.) View other details of the archive logging
                        Query: Archive log list;

Note- One can switch the current archive log by executing the command
                        Query: Alter system archive log current;

Taking a hot backup-
Now that we have prepared our database for a hot backup, we can go ahead with actually backing up the files.
Follow the following steps to take hot backup of the tablespaces

1. Find out the number of tablespaces associated with the database
               Query: Select tablespace_name from dba_tablespaces;

   The output is a list which contains names of tablespaces you will need to backup for the whole database.

2. Find out if the tablespaces are ready for hot backup
              Query: Run select * from v$backup;

   If the output says not active then it is not in hot backup mode


Note- Make sure that the database is in archivelog mode before trying to attempt this. You cannot take a hot backup of your tablespaces unless your database is operating in the archive log mode

3. Put the tablespaces in hot backup mode

               Query: Alter database begin backup;
               Query: Select * from v$backup;
   Now the output should say active.


 4. Copy the tablespace files on the hard drive to the backup location.

5. Put the tablespaces out of the backupmode
             Query: Alter database end backup;

6. Verify that the tablespaces indeed have come out of the backup mode
             Query: Select * from v$backup;

7. Switch the archive log
             Query: Alter system archive log current;

8. Backup the control file
Note- Don’t use the operating system’s copy command to do this
             Query: Alter database backup controlfile to ‘<path>\ backup filename’

9. Copy the archive logs to the backup location
Backup of the database finished.

Restoring the oracle database from a hot backup
1. Copy the tablespace files from the backup location to the installation directory of the database instance. Also copy the controlfilebackup.


2. Rename it to CONTROL01.CTL as it was earlier.
Note- If you had another copy of the control file with the name CONTROL02.CTL, then just create a second copy of the CONTROL01.CTL and rename it CONTROL02.CTL

3. DO NOT COPY OR restore the REDO logs. If the REDO logs from the previous backup period persist then delete them


4. Start the database in mount mode
              Query: startup mount;

5. Recover your database using the following
              Query: Recover database until cancel using backup controlfile;


Note- the oracle system will suggest an ‘archive log file name’ to use for recovery, if you have copied the backup logs to the same location which was being used for storing the logs by the database, then u can just keep on pressing enter. Or you may give the full path to the log file.
6. When you have applied all the logs that you had used to take the backup, then write cancel on the prompt and press enter. 


7. The transaction logs have been applied. Run the following query to open the database for transactions

 Query: Alter database open resetlogs;
 
Restore complete.....


Now CHECK IT carefully..

Now, if you going and start your instance and try to open the database if it gets open without giving any error means you are right there and you hit the bulls eye.
But ,if the database is not opened,hen you are forced to get the below error:

ORA-01589: must use RESETLOGS or NORESETLOGS option for database open  .
like this----->

Microsoft Windows [Version 5.2.3790]
(C) Copyright 1985-2003 Microsoft Corp.
 
C:\Documents and Settings\Administrator>set oracle_sid=dev
 
C:\Documents and Settings\Administrator>sqlplus /nolog
 
SQL*Plus: Release 10.2.0.1.0 - Production on Sat Aug 7 10:13:03 2010
 
Copyright (c) 1982, 2005, Oracle.  All rights reserved.
 
SQL> conn sys as sysdba
Enter password:
Connected.
SQL> select open_mode from v$database;
 
OPEN_MODE
----------
MOUNTED
 
SQL> alter database open;
alter database open
*
ERROR at line 1:
ORA-01589: must use RESETLOGS or NORESETLOGS option for database open
 

The Solution for it:
 
sql> alter database open resetlog; 


DID the below process after login into the database with sqlplus
 
shut immediate;
startup mount:
alter databse open resetlogs;


your database will be up and running :)

The true cause for getting this error is:

Cause: Either incomplete or backup controlfile recovery has been performed. After these types of recovery you must specify either the RESETLOGS option or the NORESETLOGS
option to open your database.


WE can also visit the link:  http://www.club-oracle.com/forums/how-to-take-hot-backup-of-oracle-database-t5153/

Monday, 29 April 2013

ORA-19602 cannot backup or copy active file in NOARCHIVELOG mode


It's a common mistake done by the oracle beginner to take the backup of a database in noarchivelog mode and they simply got the following error:
ORA-19602 cannot backup or copy active file in NOARCHIVELOG mode


You attempted to use RMAN to backup your database and received the following error message:
RMAN-03009: failure of backup command on ORA_DISK_1 channel
ORA-196602: cannot backup or copy active file in NOARCHIVELOG mode
This message indicates that before you can create an RMAN online backup. you need to place your database
into archivelog mode.
Enabling Archivelog Mode :
SQL> connect sys/<password> as sysdba
SQL> shutdown immediate;
SQL> startup mount:
SQL> alter database archivelog;
SQL> alter database open;
SQL> select log_mode from v$database;
LOG_MODE
--------------------------------------------------
ARCHIVELOG
SQL> archive log list;
10g introduce new feature called FRA (flashback recovery area) so all archivelog files created in FRA.
If your not using FRA then all archivelog files created in $ORACLE_HOME/dbs.
Disabling Archivelog Mode :
SQL> connect sys/<password> as sysdba
SQL> shutdown immediate;
SQL> startup mount;
SQL> alter database noarchivelog;
SQL> alter database open;

Friday, 26 April 2013

Oracle Database Manual Backup and Recovery.

Here is the most important task for a Database learner that how to Backup and Recovery .Hope you find your task.


COLD BACKUP AND RECOVERY SCENARIOS.

Cold backup of Database in Noarchivelog Mode.

1) analyze the space requirements.


SQL> select sum(sum_bytes)/1024/11024 m_bytes
2 from (
3 select sum(bytes) sum_bytes from v$datafile
4 union
5 select sum(bytes) sum_bytes from v$tempfile
6 union
7 select (sum(bytes) * members) sum_bytes from v$log
8 group by members);

2) Determine location and names of files to be backed up.
SQL> select name from v$datafile
union
select name from v$controlfile
union
select name from v$tempfile
union
select member from v$logfile;


3) shutdown database

SQL> shutdown immediate;

4) Do OS level backup

Note: I have also backed up the Online redo Log files.


cp -ivr /u01/app/oracle/oradata/orcl/* /u02/app/oracle/backup/


SQL> startup mount

Do binary backup of controlfile.

SQL> alter database backup controlfile to '/u02/app/oracle
/controlbackup/control.bkp';

Database altered.

Or trace file backup

SQL> alter database backup controlfile to trace as '/u02/app
/oracle/controlback/controltrace';

SQL> alter database open;


Restoring from cold backup in Noarchivelog.

a) when Online redo logs backup is there.


Shutdown your database if its open.

Remove the old files

restore files from backup

$ cp -ivr /u02/app/oracle/backup/* /u01/app/oracle/oradata/orcl/


startup up your database

SQL> startup


b) when Online redo logs backup is not there.


Shutdown your database if its open.


restore files from backup

$ cp -ivr /u02/app/oracle/backup/* /u01/app/oracle/oradata/orcl/


startup up your database

SQL> startup mount

SQL> recover database using backup controlfile until cancel;

when prompted

cancel

SQL> alter database open resetlogs;

This command will clear and recreate the online redo log files
and also will be a new incarnation of the database.

That means old archive logs if any cannot
be used for the purpose of recovery.

So its importatnt that you make a FRESH BACKUP of your database.


HOT BACKUP AND RECOVERY SCENARIOS.

BACKUP

1) Make sure that your database is in archivelog mode.

SQL> archive log list;
Database log mode Archive Mode
Automatic archival Enabled


2) analyze space requirements.

SQL> select sum(sum_bytes)/1024/11024 m_bytes
from (
select sum(bytes) sum_bytes from v$datafile
union
select sum(bytes) sum_bytes from v$tempfile
union
select (sum(bytes) * members) sum_bytes from v$log
group by members);


3) Determine the files that need backup;

SQL> select name from v$datafile
union
select name from v$controlfile
union
select name from v$tempfile;


4) check max sequence from online redo logfiles.
SQL> select max(sequence#)
from v$log;

MAX(SEQUENCE#)
--------------
7

5) Put the database or tablespace in begin backup mode.

For database

SQL> alter database begin backup;

For Tablespace

SQL> alter tablespace users begin backup;


SQL> select file#,status from v$backup;

FILE# STATUS
---------- ------------------
1 ACTIVE
2 ACTIVE
3 ACTIVE
4 ACTIVE
5 ACTIVE


6) Copy all the datafiles with OS utility.

7) Take the database or tablespace out of backup mode.

For database

SQL> alter database end backup;

For tablespace

SQL> alter tablespace users end backup;


SQL> select file#,status from v$backup;

FILE# STATUS
---------- ------------------
1 NOT ACTIVE
2 NOT ACTIVE
3 NOT ACTIVE
4 NOT ACTIVE
5 NOT ACTIVE


8) archive current logfile and check latest max sequence
number.

SQL> alter system archive log current;

System altered.

SQL> select max(sequence#) from v$log;

MAX(SEQUENCE#)
--------------
19


9) backup the controlfile

Binary backup

SQL> alter database backup controlfile to '/u01/app/oracle
/backup/control.bk';

Database altered.

Trace backup

SQL> alter database backup controlfile to trace as '/u01/app
/oracle/backup/trace';

Database altered.

10) backup all the archived logs generated during backup7
identifying them by log sequence number.


Recovery Scenarios when database is in archivelog with hot backup.


Case 1: Lost all the controlfiles.

shutdown the database if its open.

SQL> shutdown abort

Copy the controlfiles from backup.


SQL>startup mount

SQL> recover database using backup controlfile until cancel;

ORA-00279: change 808116 generated at 01/23/2012 23:55:11
needed for thread 1
ORA-00289: suggestion :
/u01/app/oracle/flash_recovery_area/ORCL/archivelog
/2012_01_24/o1_mf_1_12_%u_.arc
ORA-00280: change 808116 for thread 1 is in sequence #12


Open another terminal and identify the online redo log file
for the sequence number.

SQL> select * from v$logfile;

GROUP# STATUS TYPE
---------- ------- -------
MEMBER
-------------------------------------------------------------
IS_
---
3 ONLINE
/u01/app/oracle/oradata/orcl/redo03.log
NO

2 ONLINE
/u01/app/oracle/oradata/orcl/redo02.log
NO

GROUP# STATUS TYPE
---------- ------- -------
MEMBER
--------------------------------------------------------
IS_
---

1 ONLINE
/u01/app/oracle/oradata/orcl/redo01.log
NO


SQL> select * from v$log;

GROUP# THREAD# SEQUENCE# BYTES BLOCKSIZE MEMBERS ARC
---------- ---------- ---------- ---------- ---------- ---------- ---
STATUS FIRST_CHANGE# FIRST_TIM NEXT_CHANGE# NEXT_TIME
---------------- ------------- --------- ------------ ---------
1 1 10 52428800 512 1 YES
INACTIVE 807834 23-JAN-12 807837 23-JAN-12

3 1 12 52428800 512 1 NO
CURRENT 808116 23-JAN-12 2.8147E+14


2 1 11 52428800 512 1 YES
ACTIVE 807837 23-JAN-12 808116 23-JAN-12


SQL>


apply the relevant path.

Specify log: {=suggested | filename | AUTO | CANCEL}
/u01/app/oracle/oradata/orcl/redo03.log
Log applied.
Media recovery complete.

In some cases querying v$log is not helpful as it does
not show the correct sequence number, In that case apply
the online logfiles one by one until media recovery is complete.

SQL> alter database open resetlogs;

Database altered.


CASE 2: Lost System Datafile

SQL> shutdown abort;
ORACLE instance shut down.


Copy the system datafile from backup.


SQL> startup mount

SQL> recover tablespace system;
ORA-00279: change 807565 generated at 01/24/2012 01:57:07
needed for thread 1
ORA-00289: suggestion :
/u01/app/oracle/flash_recovery_area/ORCL/archivelog
/2012_01_24/o1_mf_1_11_7kvk24yl_.arc
ORA-00280: change 807565 for thread 1 is in sequence #11


Specify log: {=suggested | filename | AUTO | CANCEL}

auto

Log applied.
Media recovery complete.

SQL> alter database open;

Database altered.

CASE 3: Lost Non-System Datafiles.

Example: Users tablespace lost
due to media failure.


Take the tablespace offline.

SQL> alter tablespace users offline;
alter tablespace users offline
*
ERROR at line 1:
ORA-01191: file 4 is already offline - cannot do a normal offline
ORA-01110: data file 4: '/u01/app/oracle/oradata/orcl/users01.dbf'


SQL> alter tablespace users offline immediate;

Tablespace altered.

Copy apprpriate datafiles from backup for users tablespace.

SQL> select file_name from dba_data_files where
tablespace_name='USERS';

FILE_NAME
---------------------------------------------------
/u01/app/oracle/oradata/orcl/users01.dbf


SQL> recover tablespace users;

ORA-00279: change 807565 generated at 01/24/2012
01:57:07 needed for thread 1
ORA-00289: suggestion :
/u01/app/oracle/flash_recovery_area/ORCL/archivelog
/2012_01_24/o1_mf_1_11_7kvk24yl_.arc
ORA-00280: change 807565 for thread 1 is in sequence #11


Specify log: {=suggested | filename | AUTO | CANCEL}

auto

Log applied.
Media recovery complete.

SQL> alter tablespace users online;

Tablespace altered.

SQL> select file_name,status from dba_data_files
where tablespace_name='USERS';

FILE_NAME
------------------------------------------------------
STATUS
---------
/u01/app/oracle/oradata/orcl/users01.dbf
AVAILABLE

CASE 4: A added data file was lost after hot backup.

Example: Lost test tablespace


SQL> alter tablespace test offline;

Tablespace altered.

SQL> alter database create datafile '/u01/app/oracle
/oradata/orcl/test01.dbf';

Database altered.

SQL> alter database create datafile '/u01/app/oracle
/oradata/orcl/test02.dbf';

Database altered.

SQL> recover tablespace test;
Media recovery complete.
SQL> alter tablespace test online;

Tablespace altered.
SQL> select file_name,status from dba_data_files where
tablespace_name='TEST';

FILE_NAME
--------------------------------------------------------
STATUS
---------
/u01/app/oracle/oradata/orcl/test01.dbf
AVAILABLE

/u01/app/oracle/oradata/orcl/test02.dbf
AVAILABLE


CASE 5: Datafile lost and needs to be restored to
different location.


Example: lost my users tablespace.

SQL> alter tablespace users offline;

Tablespace altered.

SQL> select file_name from dba_data_files where
tablespace_name='USERS';

FILE_NAME
-------------------------------------------------------------
/u01/app/oracle/oradata/orcl/users01.dbf


Copy appropriate data files from backup to new location.

Rename datafiles.

1 alter database rename file '/u01/app/oracle/oradata
/orcl/users01.dbf'
2 to
3* '/u01/app/oracle/oradata/users01.dbf'


SQL> recover tablespace users;
ORA-00279: change 807565 generated at 01/24/2012 01:57:07
needed for thread 1
ORA-00289: suggestion :
/u01/app/oracle/flash_recovery_area/ORCL/archivelog
/2012_01_24/o1_mf_1_11_7kvk24yl_.arc
ORA-00280: change 807565 for thread 1 is in sequence #11


Specify log: {=suggested | filename | AUTO | CANCEL}

auto


Log applied.
Media recovery complete.

SQL> alter tablespace users online;

Tablespace altered.


SQL> select file_name,status from dba_data_files where
tablespace_name = 'USERS';

FILE_NAME
------------------------------------------------------------
STATUS
---------
/u01/app/oracle/oradata/users01.dbf
AVAILABLE


CASE 6: Lost everything including datafiles and controlfiles
except for online redo logs.


Note: There was no backup of online redo log files.

Restore all the files from backup except for online redo log files.

SQL> startup mount
ORACLE instance started.

Total System Global Area 619360256 bytes
Fixed Size 1338280 bytes
Variable Size 398459992 bytes
Database Buffers 213909504 bytes
Redo Buffers 5652480 bytes
Database mounted.

SQL> recover database using backup controlfile until cancel;
ORA-00279: change 807805 generated at 01/24/2012 14:50:13
needed for thread 1
ORA-00289: suggestion :
/u01/app/oracle/flash_recovery_area/ORCL/archivelog
/2012_01_24/o1_mf_1_10_7kwyqqnb_.arc
ORA-00280: change 807805 for thread 1 is in sequence #10

identify the correct online redo log file.

SQL> select * from v$log;

GROUP# THREAD# SEQUENCE# BYTES BLOCKSIZE MEMBERS ARC
---------- ---------- ---------- ---------- ---------- ---------- ---
STATUS FIRST_CHANGE# FIRST_TIM NEXT_CHANGE# NEXT_TIME
---------------- ------------- --------- ------------ ---------
1 1 10 52428800 512 1 YES
ACTIVE 807803 24-JAN-12 808486 24-JAN-12

3 1 9 52428800 512 1 YES
INACTIVE 807800 24-JAN-12 807803 24-JAN-12

2 1 11 52428800 512 1 NO
CURRENT 808486 24-JAN-12 2.8147E+14


SQL> select * from v$logfile;

GROUP# STATUS TYPE
---------- ------- -------
MEMBER
-------------------------------------------------------------
IS_
---
3 ONLINE
/u01/app/oracle/oradata/orcl/redo03.log
NO

2 ONLINE
/u01/app/oracle/oradata/orcl/redo02.log
NO

GROUP# STATUS TYPE
---------- ------- -------
MEMBER
---------------------------------------------------------------
IS_
---

1 ONLINE
/u01/app/oracle/oradata/orcl/redo01.log
NO


Apply logfiles sequence number wise.

First give path for sequence 10 then 11.


Specify log: {=suggested | filename | AUTO | CANCEL}
/u01/app/oracle/oradata/orcl/redo01.log
ORA-00279: change 808486 generated at 01/24/2012
15:03:43 needed for thread 1
ORA-00289: suggestion :
/u01/app/oracle/flash_recovery_area/ORCL/archivelog
/2012_01_24/o1_mf_1_11_%u_.arc
ORA-00280: change 808486 for thread 1 is in sequence #11
ORA-00278: log file '/u01/app/oracle/oradata/orcl
/redo01.log' no longer needed for this recovery


Specify log: {=suggested | filename | AUTO | CANCEL}
/u01/app/oracle/oradata/orcl/redo02.log
Log applied.
Media recovery complete.
SQL> alter database open resetlogs;

CASE 7: Lost a read only tablespace which was read only when backup
was taken.


Suppose I lost my read only users tablespace.

SQL> alter tablespace users offline;

Tablespace altered.

Restore from Backup.

SQL> alter tablespace users online;

Tablespace altered.

CASE 8:
Creating new Control File After Losing All Current
and Backup Control Files.


SQL> shutdown abort
ORACLE instance shut down.

SQL> startup
ORACLE instance started.

Total System Global Area 619360256 bytes
Fixed Size 1338280 bytes
Variable Size 398459992 bytes
Database Buffers 213909504 bytes
Redo Buffers 5652480 bytes
ORA-00205: error in identifying control file, check alert log for more info

SQL> CREATE CONTROLFILE REUSE DATABASE "ORCL" NORESETLOGS ARCHIVELOG
MAXLOGFILES 16
MAXLOGMEMBERS 3
MAXDATAFILES 100
MAXINSTANCES 8
MAXLOGHISTORY 292
LOGFILE
GROUP 1 '/u01/app/oracle/oradata/orcl/redo01.log' SIZE 50M BLOCKSIZE 512,
GROUP 2 '/u01/app/oracle/oradata/orcl/redo02.log' SIZE 50M BLOCKSIZE 512,
GROUP 3 '/u01/app/oracle/oradata/orcl/redo03.log' SIZE 50M BLOCKSIZE 512
DATAFILE
'/u01/app/oracle/oradata/orcl/system01.dbf',
'/u01/app/oracle/oradata/orcl/sysaux01.dbf',
'/u01/app/oracle/oradata/orcl/undotbs01.dbf',
'/u01/app/oracle/oradata/orcl/users01.dbf',
'/u01/app/oracle/oradata/orcl/example01.dbf'
CHARACTER SET WE8MSWIN1252;


Control file created.

SQL> recover database;


Media recovery complete.


-- All logs need archiving and a log switch is needed.

SQL> alter system archive log all;

System altered.


SQL> alter database open;

Database altered.

SQL>ALTER TABLESPACE TEMP ADD TEMPFILE '/u01/app/oracle/oradata/orcl/temp01.dbf'
SIZE 20971520 REUSE AUTOEXTEND ON NEXT 655360 MAXSIZE 32767M;

Tablespace altered.